Sunday 29 April 2018

Decorative Boxes with Cherry Blossoms

Hello crafters!! This is Lynne and spring is finally here in Canada- I'm so pleased to see it! The lovely patterns in the Cherry Blossoms paper inspired me to decorate these plain 4" wooden boxes I found at a thrift store a while back-the small patterns in the 6x6 paper pack were perfect for a project this size.


I used pink tulle to embellish the tops of two of the boxes, with diecut flowers on one and sweet pink Cherry Blossoms on the other. The third box was embellished with a fancy diecut heart. I used three different types of pearls, one on each box, and fussy cut some flowers to add interest as well. The loops and spirals were just strips cut from the patterned paper. All edges were inked in charcoal grey.


I used:

pink Cherry Blossoms
Cherry Blossom 6x6 paper set

I hope you enjoyed seeing my project, and I wish you a wonderful and creative week! xoxo

Tuesday 24 April 2018

All the Best card with Craft o'Clock

Hello everyone! 

Emmy here today sharing my newest creation using the wonderful products from Scrap & Craft.
This week I decided to work with the amazing papers from Craft o'Clock.


  Products used to create this card:
Craft o'Clock - Morning Dreams II - 12x12" Paper Pack 
Cherry Blossom 6x6 paper set
Studio 75 - Blank cards 14x14 cm white
Black Rhinestones
Double Sided Tape 12 mm
3D foam cubes

Take a 14 x 14 cm white card base. Cut a 13,5 x 13,5 cm panel from a pattern paper from the Morning Dreams II Paper Pack and distress its edges using a paper distresses. Then adhere it to the card base using foam mounting tape. Sprinkle white mist on top of all layers.


To create the layers under the sentiment use pattern paper from the paper pack and a die cut doily.  For the sentiment use a sentiment tile from the Cherry Blossom 6x6 paper set. Adhere everything using foam tape.


 Once the sentiment is in place, fussy cut flowers from a pattern paper, emboss them slightly and adhere them as shown.


As a final touch add black rhinestones.


 Thank you for stopping by today!

Have a wonderful creative week!


Sunday 22 April 2018

Art Journal: Be Authentic...


Hello everyone and happy Sunday! I'm Simona, with  another project for Scrap & Craft DT..

Today I want to show you an Art Journal spread...I love to create Art Journal pages, usually they are quite bulky, but for this new Journal I have made the resolution to go for a 'flat' look...well..at least I try! Here's the steps...

I have cut two strips from the sheet #4 of 'The Peony Avenue' collection by Studio75, and glued every strip close to the centre of the  pages, then chose a sheet of paper from the beautiful 'Morning Dreams II' collection, by Craft O' Clock, the #4, cut in half , then attached each one  using a stapler.
Used first clear gesso on the spread, then a light wash of white gesso, but not on the flowers.
Added some texture paste using two different stencils, then started adding colours using spray inks, spritzing water to dilute them a bit, always drying between each step.
When I was satisfied I added some stamping here and there with a grey dye ink, then flicked some drops of inks all over the spread.


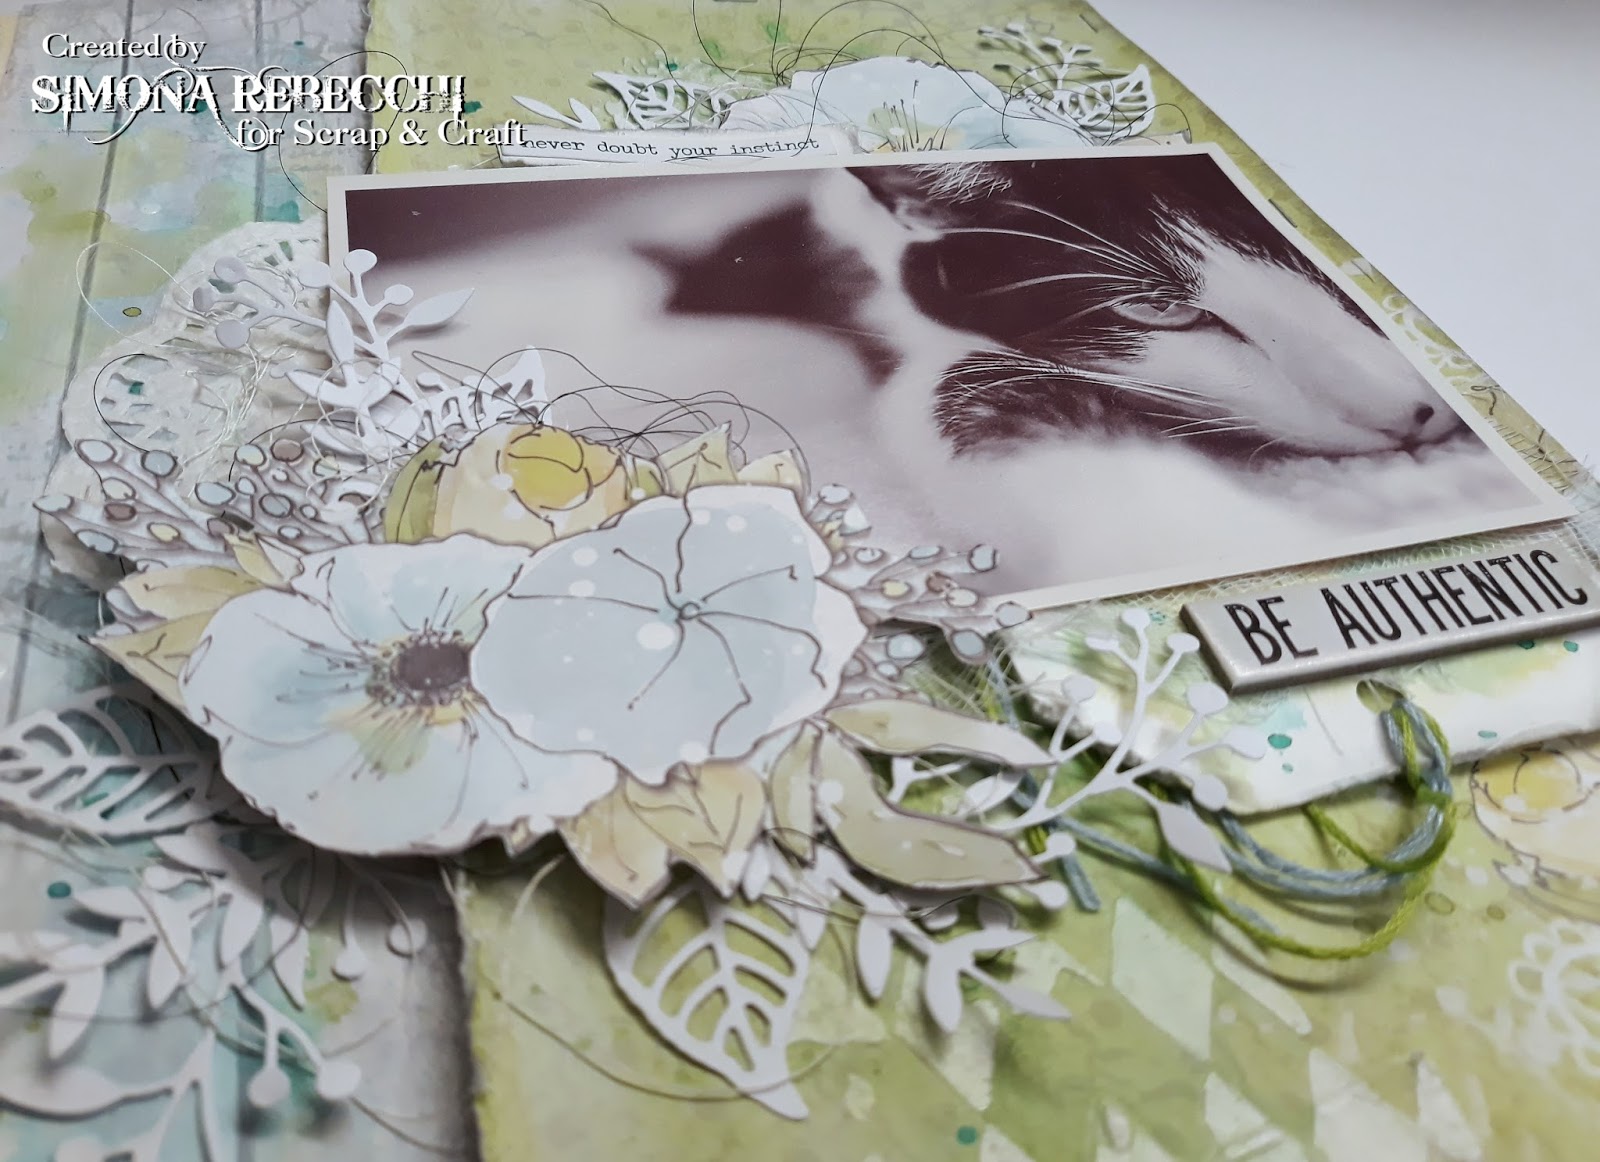
From sheet #5 of 'Morning Dreams II' collection I have fussy cut few flowers, then started to assemble all the embellishments...Added a picture of a beautiful cat, several die cuts from white cardstock, because I wanted to keep everything clear and soft, some gauze, a paper doily, some thread, and finished with sentiments chipboards.


I have used the following material that you can find in the SCRAP & CRAFT Store:


Thank you for stopping by, hope you got inspired and...see you next time!

Kisses&Hugs!
Simo.


Saturday 21 April 2018

Any occasion card and video tutorial

Hello everyone 
It's Monika today with another inspiration and video tutorial for you.
This time I used this stunning paper pad called The Peony Avenue by Studio75. This paper pad has beautiful paper in pale blue, gray and salmon, all very well complementing each other.
Few of the paper has peony flowers on a sides as well as there is a seperate paper with peonies and leaves which can be cut out as I did for the purpose of creating this card.

Hope you will like this card and my video:) 


Thursday 19 April 2018

Exploding Box with Einat

Hi dear crafty friends!

Einat here with a new and fun project to inspire you!


Today I'm sharing an exploding box with a twist. It's not a regular exploding box with space for photos. On each of the box walls I added an interactive mechanism to allow room for more photos and make things a little more interesting!


To create this project I used the beautiful Craft Clock Morning Dreams paper collection. I really love the soft colors of teal, green and yellow. I also added chipboard and flowers to embellish the lid of the box.

Supplies used:

Have fun creating!


Tuesday 17 April 2018

Masculine Steam Punk Card with Tracey

Hello dear Scrap & Craft friends!

It's Tracey back with a new project for you featuring the fabulous Studio75 Cherry Blossom Collection. While this is a beautiful feminine collection with lovely floral designs, there are also graphic papers in the collection that are perfect for masculine themed projects. My husband has a birthday this month, and I've created this steampunk card to celebrate.


Tips and Techniques
The card base is trimmed from one of the Studio75 Cherry Blossom 6x6" papers, and the birthday sentiment is trimmed from a strip included in the 12x12" collection. I placed the birthday sentiment on a piece of randomly trimmed black plastic mesh brushed with metallic art wax. I also lightly brushed the black sentiment strip with white gold wax to get a grungy feel.

I used the Studio75 Small Brick Stencil with concrete art medium to add texture. I have quite a collection of found and purchased steampunk elements. I selected some to arrange on the card, so perfect with this graphic paper and brick texture.

The background paper is stamped with grungy crackle and text stamps. The steampunk elements are brushed with several colors of wax, then brushed with rust and patina effects paste. Around the elements, I randomly brushed on Bambino Glue and sprinkled with bronze microbeads for added texture.

Thanks so much for stopping by today!

~ Blessings ~
https://gracescraps.blogspot.com/

Sunday 15 April 2018

All-occasion card and tag set


hello crafty friends!! Lynne here with a card and tag set made with the beautiful Morning Dreams II collection; I love the warm, homey look of woodgrain papers and the soft patterns set the background off so well.


I added fussy cut flowers from the paper and a little cheesecloth, then did a little stencilling with texture paste before misting lightly with Tattered Angels glimmer mist.
The title piece was created with a stackable label from Gypsy Soul Lasercuts; I heat embossed the bottom layer and covered the top one with paper before adding a diecut sentiment.


I used the same techniques on the tag, distressing and inking the edges and attaching the fussy cut bits with adhesive foam tape.The diecut sentiment was heat embossed like the label on the card.


The larger white flower is from the store, and the smaller one that I found in my stash coordinated quite well with it.


Thanks so much for stopping by, and I wish you a wonderful and creative week!

SCRAP & CRAFT PRODUCTS

Thursday 12 April 2018

Enjoy Every Moment


Good Morning Crafty Friends 
Sandra Here with my First post for Scrap and Craft 

My First card to share 


A5 Card Layered with Beautiful Papers from 
Edged with Black soot Distress Ink 


Fussy cut Elements from the cover 
Stamped and Fussy Cut Leaves
Pink Cherry Blossom Flowers 


Lastly added one of the beautiful Adhesive Badges 

Crafty Hugs Sandra 


Tuesday 10 April 2018

Best Wishes card with Studio 75

Hello everyone!

Emmy here today sharing my very first card I created for the Scrap & Craft blog. I'm really excited to be a member of their amazing design team!


Products used to create this card: 
Studio 75 - Blank cards 14x14 cm white
Silver Rhinestones

To create this card you need one 14 x 14 cm white card base. Then you cut a 13,5 x 13,5 cm panel from a pattern paper from The Peony Avenue Paper Pack and distress its edges using a paper distresses. To adhere the pattern paper panel to the card base, you will need a foam mounting tape. 


As a final touch, I sprinkled bluish mist on top.

For my sentiment I used a sentiment tile from the Cherry Blossom 6x6 paper set and a ticket fussy cut from The Peony Avenue Paper Pack. I added a die cut paper doily and rhinestones to decorate it.


To complete my design I added paper flowers (Peach Cherry blossoms) and fussy cut peonies from The Peony Avenue Paper Pack pattern papers.


Thank you for stopping by today! 

Have a wonderful creative week!